Moving Towards Samadhi
A blog about trying to manage everything I've added to my life.
Tuesday, April 19, 2011
Top 5 Lessons We Learned About Adopting A Retired Racing Greyhound
I had a dog growing up. She was a mixed terrier that my parents found in the pound. I recall having to walk her and feed her and bath her and play with her and all of the basic things you are supposed to do as a pet owner. As an adult, my memories led me to believe that it would be relatively easy to go through the process again with our new dog.
I was wrong. Well, not completely wrong.
The experience of owning a family pet as a child is very different than as an adult. I guess I just blocked out or didn’t remember the details of what to do to prevent the dog from soiling indoors or what to do when the dog does soil indoors.
But getting through our first month or so together as a family has been worth it.
Below are the top 5 things to we learned from adopting a retired racing greyhound:
1. A retired racing greyhound is like a 30kg puppy. While very familiar with a crate and a racetrack, the dog will be unfamiliar with how a home works. Introduce one room at a time and be patient even if the dog prefers to stay in the crate or in one corner for the first few days.
2. A greyhound is not an endurance athlete. This one should be obvious because they are sprinters, but for whatever reason, we assumed that she would be fine with a 30 minute walk. We actually had to build her up to 30 minutes of continuous walking. Her preferred natural state is rest.
3. An insecure greyhound is an excellent escape artist. Due to the lack to exposure to the outside world, she was skiddish about pretty much everything that was big and moved and made noise. Because of her lightning speed and skinny body, she would quickly run and hide behind furniture. It’s best to slowly expose a newly retired greyhound to new sights and sounds so as to avoid a panic attack.
4. Invest in a behaviorist. Behavioral problems are common in dogs from adoption centers. The process of adoption is traumatizing and a new owner rarely gets the full history of the dog. Good habits can be unlearned in stressful situations. It’s best to start the new relationship on the right foot with good behavior by getting help from an expert.
5. A retired racer will test your patience. The running theme in the above points is that while the dog will have problems, they are not insurmountable. A retired greyhound can be an excellent pet for caring owners who are willing to put in the effort and the time to help the dog adjust to retirement.
Now if only I could have retired at 21 (in dog years = 3 in people years).
Labels:
Dog,
Dog Adoption,
Greyhound,
Greyhound Adoption,
London Dog Adoption
Posted by
Little Bites By Ceci
Saturday, April 16, 2011
Super Easy Cute and Tiny Amigurumi Bear
I'm building up my skills in Amigurumi. This week, I tried to learn how to do another ear type.
I realize now that the yarn color is a bit dark to show well in pictures, so the picture this week is a little dark. But no fear, it's always best to make one for yourself and see.
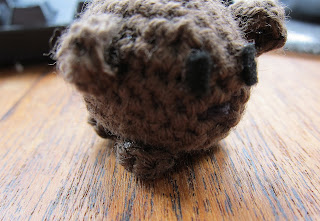
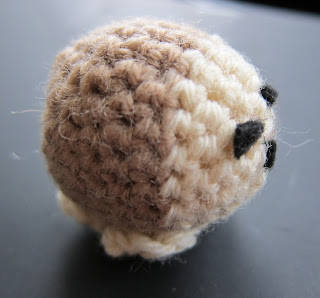
Picture: Too Cute Tiny Amigurumi Bear (From this picture, it looks a bit like a monkey, but trust me, it's a bear.)
Print Friendly Version
Materials:
3.5 mm Crochet Hook
4 ply yarn (I picked dark brown for everything except for the nose which is black.)
Stich marker (I used a bobby pin.)
Yarn needle
Sutffing
Black Felt
Scissors
Super Glue
Instructions:
Body
R1: Create a magic circle (6) (Now, each row will be in the round.)
R2: *Sc, Inc* til end of row (9)
R3: *Sc, Sc, Inc* til end of row (12)
R4: *Sc, Sc, Inc* til end of row (16)
R5: *Sc, Sc, Sc, Inc* till end of row (20)
R6: Sc til end of row (20)
R7: *Sc, Sc, Sc, Sc, Inc* til end of row (24)
R8: Sc til end of row (24)
R9: *Sc x 10, Decr* til end of row (22)
R10: *Sc x 9, Decr* til end of row (20)
R11: *Sc x 8, Decr* til end of row (18)
R12: *Sc, Decr* til end of row (12)
Stuff the body tight.
R13: *Decr* til end of row (6)
R14: *Decr* til end of row (3)
Bind off. Cut off leaving a little tail.
Paws
Create a magic circle (6) x4
Ears
Chain 2. (2)
In 1st chain loop, sc 3 times. (3)
Turn work over.
In now 1st chain loop, inc; In 2nd chain loop, sc; In 3rd chain loop, inc. (5)
Slip stitch into 1st chain (This will pinch the ear and make a curved shape.).
Bind off leaving enough at the end to sew onto the bear.
Repeat to make the second ear.
Assembly:
Super glue the paws onto the body.
Sew the ears onto the bear.
Cut out two eye shaped pieces in the black felt for the eyes. This week I made rectangular eyes. Glue onto face.
Take black yarn and cut roughly a 3 inch piece off. Take the yarn needle and thread the black yarn through the center of the face where the nose would be normally. Tie a knot twice in the center of the face after removing the needle. Use needle to weave in ends of the black yarn back into the body.
Perfectly tiny and perfectly cute amigurumi bear.
Labels:
Amigurumi,
Animal,
Bear,
Crochet,
Cute,
Easy Amigurumi,
Easy Crochet,
Tiny Amigurumi,
Tiny Bear,
Yarn
Posted by
Little Bites By Ceci
Friday, April 15, 2011
So she’s not a Greyhound?
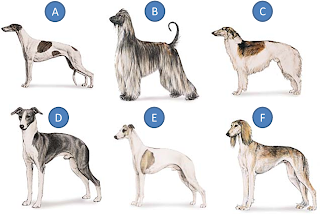
Can you tell which one is the Greyhound?
To be honest, before getting Soy Sauce, I couldn’t tell the different between a Whippet, Greyhound, Italian Greyhound, etc. I also had a lot of misconceptions.
Below is a brief description as well as some links for the US and the UK.
(A) Greyhound - "Tall and lean, the Greyhound is the fastest breed of dog. As a sight hound, the breed pursues game using its vision and speed. Today, however, the Greyhound primarily serves as a sweet and personable companion. The breed can be any color, including black, fawn and red, often combined with white or brindle markings. The Greyhound has been owned by many prominent figures in history, including President Rutherford B. Hayes and General George A. Custer."
US Kennel Club - Greyhound Resources
UK Kennel Club - Greyhound Resources
(B) Afghan Hound - 'Referred to as an aristocrat, the Afghan Hound’s appearance is one of dignity and aloofness. Well covered with thick, silky hair, very fine in texture, the Afghan hound’s coat is a sort found among animals native to high altitudes. They can come in all colors, and while the breed is an excellent hound (hunting by sight) its popularity here has been generated by the breeds’ spectacular qualities as a show dog."
US Kennel Club - Afghan Hound Resources
UK Kennel Club - Afghan Hound Resources
(C) Borzoi - "A graceful, elegant hound, the Borzoi is a sight hound, meaning he hunts by sight rather than scent. The breed’s tall and rangy body allows him to chase quarry for long distances. Today, they are popular in the lure coursing field, and are often seen in the show and companion event rings as well. Their long, silky coat can be flat, wavy or curly and may be any color or combination of colors."
US Kennel Club - Borzoi Resources
UK Kennel Club - Borzoi Resources
(D) Italian Greyhound - "The Italian Greyhound is extremely slender and barely over a foot tall, but has all the grace and sweetness of his taller Greyhound relatives. There is debate as to whether they were originally bred for hunting small game or meant to be simply a companion. In all likelihood, both are true, as they are adaptable to city and country life. The Italian Greyhound’s coat can be any color, except brindle and classic black and tan."
US Kennel Club - Italian Greyhound Resources
UK Kennel Club - Italian Greyhound Resources
(E) Whippet - "A medium-sized sighthound giving the appearance of elegance and fitness, the Whippet denotes great speed, power and balance. In fact, the Whippet, an English Greyhound in miniature, is the fastest domesticated animal of his weight, capable of speeds up to 35 m.p.h. A very versatile breed, they can appear in a wide variety of colors and markings. Although keen when racing or coursing, they are quiet and dignified in their owner’s living room."
US Kennel Club - Whippet Resources
UK Kennel Club - Whippet Resources
(F) Saluki - "Although the breed appears graceful and fragile, don’t be fooled – the Saluki is an avid hunter and possesses the strength and endurance to chase quarry over long distances and difficult terrain. Today, this sight hound is popular at lure coursing events and in the show ring. Salukis can be coated (with feathering on the legs) or smooth. In both varieties, colors include white, cream, fawn, golden, red, grizzle and tan, tricolor, and black and tan."
US Kennel Club - Saluki Resources
UK Kennel Club - Saluki Resources
Hope that helps to keep the breeds straight. Oh, and yes, Soy Sauce is really a Greyhound. Can't you tell?
Tuesday, April 12, 2011
Rescue Dog Centers In London
So You’ve Decided To Rescue A Dog?
Congratulations! It can be very difficult to choose to rescue a dog rather than getting a puppy. Puppies are cute and small and generally have no previous bad experiences with people. However, choosing a rescue dog means giving another life a second or sometimes third chance in finding a place to call home.
We’ve had friends who have gone the puppy route and friends who have gone the rescue route. Everyone needs to make their own decision given their own personal circumstances and that’s ok.
When we first arrived in London, it wasn’t too clear as to where to start looking for a rescue center. Below is a list of rescue centers with a few notes from our own experience. Some are big and some are small, but all of them are relatively well-known in London. (The list is by no means exhaustive, so please feel free to comment with any corrections.)
Battersea Dogs & Cats Home - Checked it out. Lovely place. We were told that they don't turn away any dogs. Because of this, they tend to have a lot of Staffordshire Bull Terriers (Staffies).
The Mayhew Animal Home - Checked it out. A slightly smaller place, but also great. They don't allow people to just visit and see the dogs without going through the adoption process. This can be nice for the animal to avoid being put on display like in a zoo.
DogsTrust - Checked it out. This is where we found Soy Sauce. The London office is a bit of a trek to get to if you don't have a car, but it is well worth it for the selection.
RSPCA - We have this too in the States, so it deserves an honorable mention.
London Dog Rescue - Also deserves honorable mention. It provides links for adoption centers specific to breed.
If you know of any other major adoption centers, please let me know.
If you have a London dog adoption story to share, reach out.
Labels:
Dog,
Dog Adoption,
Greyhound Adoption,
London Dog Adoption
Posted by
Little Bites By Ceci
Saturday, April 9, 2011
Super Easy Cute and Tiny Amigurumi Badger
I tried to up the ante and create a Badger. I haven't done ears before, so I thought now was a good time to learn.
The pattern is mostly mine except for the ears. I wanted to see how ears work first before attempting to make one up myself. The number in parenthesis is how many stitches you should have in the row.
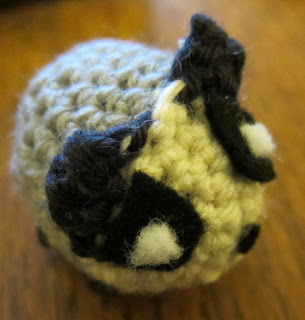
Picture: Too Cute Tiny Amigurumi Badger
Print Friendly Version
Materials:
3.5 mm Crochet Hook
4 ply yarn (I picked gray for the body, creamish color for the face and black for the ears and feet.)
Stich marker (I used a bobby pin.)
Sutffing
Black Felt
White Felt
Scissors
Super Glue
Instructions:
Body
Hint: Start with the cream color for the face
R1: Create a magic circle (6) (Now, each row will be in the round.)
R2: *Sc, Inc* til end of row (9)
R3: *Sc, Sc, Inc* til end of row (12)
R4: *Sc, Sc, Inc* til end of row (16)
R5: *Sc, Sc, Sc, Inc* till end of row (20)
Incorporate the black yarn only for the ear part. Otherwise, continue to use the creamish color for the rest of this row.
R6**: 7 sc, (sc into front loop of st above eye, ch 3, skip 1st ch, 2 sc [down chain], sc into f.l. next head st of rnd; turn [work up ear], sc, sl st; turn [work down ear], sl st, sl st into f.l. of next head st) 3 sl st in f.l. of next 3 sts in round; repeat parentheses once, 7 sc
**R6 is where I made the ears. I used the ear pattern from Falwyn's fox pattern (Click here for pattern.) She also has a video tutorial on how to do the ears on her blog as well.
Switch to the gray color.
R7: *Sc, Sc, Sc, Sc, Inc* til end of row (24)
R8: Sc til end of row (24)
R9: *Sc x 10, Decr* til end of row (22)
R10: *Sc x 9, Decr* til end of row (20)
R11: *Sc x 8, Decr* til end of row (18)
R12: *Sc, Decr* til end of row (12)
Stuff the body tight.
R13: *Decr* til end of row (6)
R14: *Decr* til end of row (3)
Bind off. Cut off leaving a little tail.
Paws
Create a magic circle (6) x4
Assembly:
Super glue the paws onto the body.
Cut out two pill shaped pieces out of the black felt to make the black fur on the badger's face.
Cut out a small black piece for the nose.
Cut out two small white pieces for the eyes.
Glue onto face.
It's another super quick, super easy, super cute amigurumi project.
Labels:
Amigurumi,
Animal,
Badger,
Crochet,
Cute,
Easy Amigurumi,
Easy Crochet,
Tiny Amigurumi,
Tiny Badger,
Yarn
Posted by
Little Bites By Ceci
Thursday, April 7, 2011
Our Newest Family Member
So, we’ve been wanting a dog for a while, but circumstances have made it difficult to get one:
- Our building won’t allow one.
- We moved countries.
It wasn’t until three months ago when we decided to be more determined to get one.
Why not a puppy?
Well, we’re both working full-time, and he’s never had a dog before. (So potty training, obedience training…all things we didn’t want to deal with.)
Also, my first dog was a rescue and there is something nice about giving a dog a second chance.
So, with all of the unwanted dogs in London, wouldn’t it be easy to get one?
Uh, no. I learned a few things about the British English language during this experience, and one of the words is “unsuitable”. As in…
- “Well, your living arrangements are unsuitable for the dog.”
- “The dog’s temperament is unsuitable for your household.”
- “Your lifestyle is unsuitable for the dog’s needs.”
After going through 3 rehoming centers, I felt that that we were jumping through more hoops than it takes to have a child.
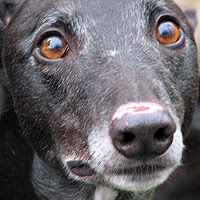
Nonetheless, after roughly a month of going out to rehoming centers every weekend and endless follow-up phone calls, we found Soy Sauce. She is a retired greyhound.
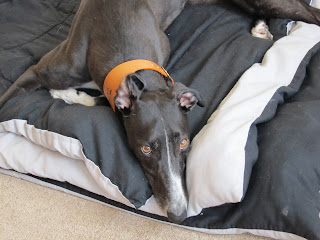
This is her during her first days.
Needless to say within the first few days with us, she had thrown up in the car, pee'd on the carpet in several rooms on several occasions, poo'd on the carpet in several rooms on several occasions, and refused to go outside (which may have contributed to the previous problems.)
We got her a behaviorist, and we’re still working on getting up her confidence so she can have a dog walker take her in the afternoons to play with other dogs.
It hasn’t been easy, but it has been worth it.
Look out for upcoming posts with topics like…
- What should I know about adopting a dog in London?
- Where can I go to for help about greyhounds?
- What should I feed my greyhound?
Saturday, April 2, 2011
Super Easy Cute and Tiny Mole Amigurumi
I have tried to do amigurumi for a while but I haven’t been very successful because I was trying to make complicated patterns. After focusing on the basics (magic circle, single crochet, increase, decrease, bind off), I was on my way to making my own patterns.
This is my first attempt at writing a pattern. The number in parenthesis is how many stitches you should have in the row.
Picture: Too Cute Tiny Amigurumi Mole
Print Friendly Version
Materials:
3.5 mm Crochet Hook
4 ply yarn (I picked a tanish color, and a creamish color for the mole.)
Stich marker (I used a bobby pin.)
Sutffing
Black Felt
Scissors
Super Glue
Instructions:
Body
Hint: Start with the cream color for the face
R1: Create a magic circle (6) (Now, each row will be in the round.)
R2: *Sc, Inc* til end of row (9)
R3: *Sc, Sc, Inc* til end of row (12)
R4: *Sc, Sc, Inc* til end of row (16)
R5; *Sc, Sc, Sc, Inc* till end of row (20)
Switch colors to tanish color.
R6: Sc til end of row (20)
R7: *Sc, Sc, Sc, Sc, Inc* til end of row (24)
R8: Sc til end of row (24)
R9: *Sc x 10, Decr* til end of row (22)
R10: *Sc x 9, Decr* til end of row (20)
R11: *Sc x 8, Decr* til end of row (18)
R12: *Sc, Decr* til end of row (12)
Stuff the body tight.
R13: *Decr* til end of row (6)
R14: *Decr* til end of row (3)
Bind off. Cut off leaving a little tail.
Paws
Create a magic circle (6) x4
Assembly:
Super glue the paws onto the body. Cut eyes and nose out of felt and glue onto face.
Et voila, a super teeny tiny mole. I did everything in under an hour, so it’s a really quick project with leftover yarn.
This is my first attempt at writing a pattern. The number in parenthesis is how many stitches you should have in the row.
Picture: Too Cute Tiny Amigurumi Mole
Mole Face
Mole Tail
Print Friendly Version
Materials:
3.5 mm Crochet Hook
4 ply yarn (I picked a tanish color, and a creamish color for the mole.)
Stich marker (I used a bobby pin.)
Sutffing
Black Felt
Scissors
Super Glue
Instructions:
Body
Hint: Start with the cream color for the face
R1: Create a magic circle (6) (Now, each row will be in the round.)
R2: *Sc, Inc* til end of row (9)
R3: *Sc, Sc, Inc* til end of row (12)
R4: *Sc, Sc, Inc* til end of row (16)
R5; *Sc, Sc, Sc, Inc* till end of row (20)
Switch colors to tanish color.
R6: Sc til end of row (20)
R7: *Sc, Sc, Sc, Sc, Inc* til end of row (24)
R8: Sc til end of row (24)
R9: *Sc x 10, Decr* til end of row (22)
R10: *Sc x 9, Decr* til end of row (20)
R11: *Sc x 8, Decr* til end of row (18)
R12: *Sc, Decr* til end of row (12)
Stuff the body tight.
R13: *Decr* til end of row (6)
R14: *Decr* til end of row (3)
Bind off. Cut off leaving a little tail.
Paws
Create a magic circle (6) x4
Assembly:
Super glue the paws onto the body. Cut eyes and nose out of felt and glue onto face.
Et voila, a super teeny tiny mole. I did everything in under an hour, so it’s a really quick project with leftover yarn.
Labels:
Amigurumi,
Animal,
Crochet,
Cute,
Easy Amigurumi,
Easy Crochet,
Mole,
Tiny Amigurumi,
Tiny Mole,
Yarn
Posted by
Little Bites By Ceci
Subscribe to:
Posts (Atom)

